

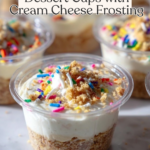
There’s something absolutely magical about the whimsy and childhood nostalgia that pours out of every spoonful of these Birthday Cake Dessert Cups. With buttery vanilla cookie crumbs, a creamy cake-flavored filling, and plenty of rainbow sprinkles, they’re as fun to create as they are to eat. Whether you’re celebrating an actual birthday, a big win, or just want a pop of color and sweetness in your week, these no-bake cuties will put a smile on anyone’s face.

Ingredients You’ll Need
You don’t need fancy gear or rare ingredients for these Birthday Cake Dessert Cups—just a handful of essentials. Each element brings a bit of magic, from the satisfying crunch of cookies to the fudgy, fluffy filling and that iconic burst of rainbow sprinkles.
- Crushed vanilla sandwich cookies: The base layer provides a cookie-cake flavor and a wonderful crunchy contrast to the creamy filling.
- Salted or unsalted butter (melted): Butter binds the cookie crumbs together, making a rich, melt-in-your-mouth crust.
- Rainbow sprinkles: Mixed into both the cookie crust and the creamy layer, these give each cup its festive pop of color.
- Cream cheese (room temperature): The backbone of the creamy filling, ensuring tang and lusciousness all at once.
- Granulated sugar: Sweetens the filling just right, balancing out the tang from the cream cheese.
- Vanilla extract: Boosts that classic birthday-cake flavor and adds warmth.
- Cake mix (heat-treated): The secret to that unmistakable birthday cake flavor—make sure you heat treat it for food safety!
- Heavy whipping cream: Whips into fluffy peaks for a light, airy, mousse-like texture.
- Additional cookie crumbs and rainbow sprinkles: To finish the cups with a party-perfect topping.
How to Make Birthday Cake Dessert Cups
Step 1: Prepare the Cookie Crumb Base
Start off by combining your crushed vanilla sandwich cookies with the melted butter. The mixture should come together like cheesecake crumbs. Then, fold in a tablespoon of rainbow sprinkles—they’ll peek out of the base, making every layer a little more exciting.
Step 2: Pack Into Cups
Divide the crumb mixture evenly among your 28 mini cups. A small cookie scoop or a spoon works well, and then use another cup to gently press the crumbs down. You want a firm, tidy bottom layer for easy dipping (and no crumbling!).
Step 3: Mix the Cream Cheese Filling
Time for the creamy magic! Beat together the room temperature cream cheese and granulated sugar with a hand mixer on medium. You’re aiming for smooth and well-blended—give it at least a minute or two.
Step 4: Flavor With Cake Mix and Vanilla
Add your heat-treated cake mix and vanilla extract right into the cream cheese mixture. Continue mixing until fully incorporated. This step infuses the filling with that sweet, nostalgic birthday cake vibe.
Step 5: Whip It Up
Pour in the heavy whipping cream and whip on medium-high until the mixture is light, fluffy, and holds its shape. This is the secret to a mousse-like texture that feels celebratory and indulgent.
Step 6: Fold in the Sprinkles
Now, gently fold in two tablespoons of rainbow sprinkles so they’re evenly spread through the filling. The colors will swirl with every scoop—and these are the happiness-makers in Birthday Cake Dessert Cups!
Step 7: Pipe the Filling
Transfer the creamy filling into a piping bag (a big zip bag with the corner snipped off works too). Pipe into each cup until about three-quarters full. Don’t worry about being perfect—swirly tops look adorable!
Step 8: Add Finishing Touches
Sprinkle extra cookie crumbs and more rainbow sprinkles on top of each dessert cup. It’s those festive finishing touches that make the Birthday Cake Dessert Cups truly special.
Step 9: Chill and Serve
Pop lids on the cups (if you have them) and chill in the fridge. The cups can be served right away, but they’re even better after some fridge time—giving the flavors a chance to meld together into the best birthday bite.
How to Serve Birthday Cake Dessert Cups
Garnishes
Garnishing is where you can get creative! Besides extra sprinkles and cookie crumbs, consider whipped cream, edible glitter, or even a birthday candle in each cup for ultimate party vibes. Each cup should look like a mini celebration.
Side Dishes
These Birthday Cake Dessert Cups are delicious all on their own, but they pair perfectly with a tray of fresh berries, a hot cup of coffee, or a scoop of ice cream for a bigger dessert spread. They’re also wonderful alongside salty snacks to balance their sweet charm.
Creative Ways to Present
Serve the cups on a tiered dessert tray, or line them up for a colorful dessert bar. For parties, add a personalized touch by tying a ribbon or tiny tag around each cup. If it’s a kids’ party, scatter mini plastic party picks or confetti around the tray to dial up the fun factor.
Make Ahead and Storage
Storing Leftovers
Leftover Birthday Cake Dessert Cups keep wonderfully in the fridge for up to three days. Just be sure to seal each cup well with a lid or plastic wrap to keep the filling fluffy and moist. The cookie base stays nicely crisp even after chilling.
Freezing
While the texture is best fresh, you can freeze these dessert cups for up to one month. Wrap each tightly in plastic wrap and stack them carefully in an airtight container. Thaw overnight in the fridge before eating—just note that the sprinkles may lose a touch of their color vibrancy.
Reheating
No reheating needed! In fact, these are meant to be enjoyed chilled, so simply let them come up to your ideal cold-and-creamy temperature straight from the fridge. If frozen, let them thaw completely in the refrigerator before serving for best taste and texture.
FAQs
Can I use chocolate sandwich cookies instead?
You absolutely can, especially if you love a more chocolatey twist! Chocolate cookies will give the base a deeper flavor and make the Birthday Cake Dessert Cups a little like funfetti brownies in a cup.
How do I heat-treat the cake mix?
Spread the cake mix on a baking sheet and bake at 350°F for 5 minutes, then let it cool before using. This simple step ensures the cake mix is safe to eat in no-bake treats like these.
Can I make these gluten-free?
Definitely! Substitute gluten-free vanilla sandwich cookies and make sure your cake mix is certified gluten-free. The rest of the ingredients are naturally gluten-free, so everyone can join the party.
Can I double the recipe?
You sure can, and it’s a brilliant idea for bigger celebrations! Just scale all the ingredients up evenly and prepare several batches of crumb and filling—it’s easy and everyone will be thrilled to have seconds.
What kind of cups should I use?
Sturdy 2-ounce plastic cups work perfectly, but you can also use glass jars or little dessert glasses for a more elegant presentation. Just make sure whatever you choose shows off the pretty layers and fits a manageable single-serving.
Final Thoughts
If you’re looking for a dessert that’s easy, festive, and seriously delicious, the Birthday Cake Dessert Cups deserve a place at your next gathering. Every bite brings that joyful, cake-batter nostalgia—so I can’t wait for you to whip up a batch and see just how fun dessert can be!
Print
Birthday Cake Dessert Cups Recipe
- Prep Time: 20 minutes
- Cook Time: 10 minutes
- Total Time: 30 minutes
- Yield: 28 servings 1x
- Category: Dessert
- Method: Mixing, Chilling
- Cuisine: American
- Diet: Vegetarian
Description
These Birthday Cake Dessert Cups are a delightful treat that captures all the flavors of a classic birthday cake in a convenient individual serving. Creamy cheesecake filling with cake mix and sprinkles is layered over a buttery cookie crust, making for a festive and delicious dessert.
Ingredients
Cookie Crust:
- 2 cups crushed vanilla sandwich cookies
- ¼ cup salted or unsalted butter (melted)
- 1 tbsp rainbow sprinkles
Cheesecake Filling:
- 8 oz cream cheese (room temperature)
- ½ cup granulated sugar
- 1 tsp vanilla extract
- ¾ cup cake mix (heat treated)
- 1 ½ cups heavy whipping cream
- 2 tbsp rainbow sprinkles
- additional cookie crumbs and rainbow sprinkles for topping
Instructions
- Prepare Cookie Crust: In a small bowl, combine crushed vanilla sandwich cookies and melted butter. Add rainbow sprinkles and mix well.
- Assemble Dessert Cups: Portion the cookie crumbs into 28 plastic cups. Press the crumbs into the bottom of each cup.
- Make Cheesecake Filling: Cream together cream cheese and sugar. Add vanilla extract, cake mix, and heavy cream. Whip until light and fluffy.
- Finish Filling: Fold in rainbow sprinkles. Transfer filling to a piping bag.
- Fill Cups: Pipe the cheesecake mixture into cups, filling 3/4 full.
- Top and Chill: Sprinkle cookie crumbs and rainbow sprinkles on top of each cup. Seal with lids and chill before serving.
Notes
- For best results, ensure all ingredients are at room temperature.
- You can customize the sprinkles to match different themes or occasions.
- Experiment with different cake mix flavors for unique variations.
Nutrition
- Serving Size: 1 dessert cup
- Calories: 240
- Sugar: 15g
- Sodium: 180mg
- Fat: 18g
- Saturated Fat: 10g
- Unsaturated Fat: 6g
- Trans Fat: 0g
- Carbohydrates: 20g
- Fiber: 0.5g
- Protein: 2g
- Cholesterol: 50mg
Your email address will not be published. Required fields are marked *