

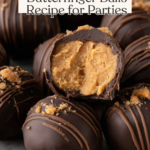
If you’re searching for a dessert that’s equal parts nostalgic, effortless, and utterly irresistible, Butterfinger Balls are here to steal the show. Think of these as little bites of peanut butter bliss, studded with crunchy graham crumbs and Butterfinger pieces, all lovingly wrapped in a blanket of silky chocolate. It’s a treat that feels special enough for the holidays yet easy enough to whip up on a lazy Sunday. Trust me, these Butterfinger Balls are about to become a much-requested favorite in your kitchen!

Ingredients You’ll Need
Gathering your ingredients for Butterfinger Balls is wonderfully simple, but each item has a starring role. From the creamy peanut butter for richness to the iconic Butterfinger crunch inside and out, every component adds flavor, texture, or color to these decadent bites.
- Creamy Peanut Butter: Use a regular variety (avoid natural types) for the smoothest, creamiest texture in every bite.
- Butter (softened): Adds a luscious, melt-in-your-mouth richness that helps everything blend beautifully.
- Vanilla Extract: Just a teaspoon brings a warm, aromatic note that ties all the flavors together.
- Powdered Sugar: Sweetens the mix gently and gives body to each ball, making the filling smooth and easy to roll.
- Graham Cracker Crumbs: A touch of crunch and extra structure; a subtle, toasty backdrop for all that peanut butter goodness.
- Crushed Butterfinger Bars: The signature crispy, peanut-buttery shards that add that unmistakable Butterfinger appeal throughout.
- Chocolate Bark or Chocolate Chips: For dipping; go with your favorite milk or dark chocolate to create that luscious coat.
- Garnish: Extra crushed Butterfingers, holiday sprinkles, or even a pinch of coarse salt make these treats extra pretty and flavorful.
How to Make Butterfinger Balls
Step 1: Make the Peanut Butter Mixture
In a medium bowl, add the creamy peanut butter and softened butter. Using an electric mixer (or a stand mixer with the paddle attachment), beat on medium speed until the two blend together into a dreamy, creamy base. It’s important to get this step right—your mixture should look smooth and almost fluffy before you move on.
Step 2: Add the Vanilla
With your mixer running on low, blend in the vanilla extract. You’ll notice the aroma gets even better, adding a subtle warmth that plays so well with the peanut butter. This little step lays the foundation for balanced, craveable flavor in your Butterfinger Balls.
Step 3: Mix in the Powdered Sugar
Time to sweeten! Add the powdered sugar in batches, blending on low with each addition. Scrape down the sides as you go so everything comes together evenly. The dough will go from sticky to a thick, shapeable consistency—that’s when you know it’s just right.
Step 4: Fold in Graham Crumbs and Butterfinger Pieces
With a spatula or spoon, gently stir in the graham cracker crumbs and the crushed Butterfinger bars. This is where texture magic happens—those classic crispy bits transform the mixture from smooth to delightfully crunchy, guaranteeing every bite tastes like candy bar heaven.
Step 5: Shape the Balls
Line a large baking sheet with parchment paper. Scoop out about 1 to 1 1/2 tablespoons of dough per ball, then roll between your palms until smooth. Place each ball on the prepared baking sheet, spacing them out so they don’t stick together. This is a great hands-on kitchen moment—don’t be afraid to get a little messy!
Step 6: Chill the Balls
Pop the baking sheet in the freezer for about 30 minutes. Chilling lets the Butterfinger Balls firm up, making it much easier to dip them in chocolate without falling apart. The anticipation will be worth every second!
Step 7: Melt the Chocolate
While the balls chill, melt your chocolate bark or chips in a microwave-safe bowl. Heat in 30-second intervals at 50 percent power, stirring after each burst. Remove before it’s completely melted and stir—the last bits will melt from residual heat, giving you a silky, smooth dipping chocolate.
Step 8: Dip and Garnish
Now the fun part: Dip each chilled ball into the melted chocolate, using a fork or dipping tool. You can cover them completely, or leave a little peanut butter mixture peeking through for a handmade look. While the chocolate is still wet, sprinkle with extra crushed Butterfingers, colorful sprinkles, or a bit of flaky sea salt for an extra-special finish.
Step 9: Let the Chocolate Set
Allow the coated Butterfinger Balls to sit until the chocolate hardens completely. If you’re in a hurry, pop them back in the fridge for a few minutes. Once set, it’s time for the best part—enjoying your homemade masterpiece!
How to Serve Butterfinger Balls
Garnishes
Garnishing Butterfinger Balls is where you can truly get creative. Try scattering finely crushed Butterfinger over the top for even more crunch, or go festive with a shower of holiday sprinkles. For an elegant touch, a light sprinkle of coarse sea salt makes the chocolate and peanut butter pop—don’t be afraid to have fun and mix it up with the seasons!
Side Dishes
These Butterfinger Balls are dessert royalty, but they play well with others. Serve alongside a scoop of vanilla ice cream, fresh berries, or even a bowl of whipped cream for dipping. If you’re creating a dessert platter, pair them with brownies or cookies for an irresistible, crowd-pleasing spread.
Creative Ways to Present
Take your presentation up a notch! Arrange Butterfinger Balls in cupcake liners or mini candy cups to make them pop on a party table. Pile them high on a pretty cake stand, or tuck them into clear treat bags tied with colorful ribbon for memorable edible gifts. Layered in a mason jar with extra graham crackers, they make a gorgeous (and delicious) DIY dessert jar.
Make Ahead and Storage
Storing Leftovers
Once set, store your Butterfinger Balls in an airtight container in the fridge. They’ll stay fresh and delicious for up to a week—if they last that long! Keep them chilled so the chocolate doesn’t get too soft, especially if your kitchen runs warm.
Freezing
Butterfinger Balls freeze beautifully, making them ideal for meal prep or party planning. Simply place them in a single layer on a baking sheet and freeze until solid. Transfer to a zip-top bag or airtight container, with parchment between the layers, and freeze for up to three months. They’re ready to eat straight from the freezer, or thaw in the fridge for an hour.
Reheating
There’s no need to reheat Butterfinger Balls—they’re perfect chilled or at room temperature. If frozen, just let them thaw gently in the fridge for best texture. Avoid microwaving to keep the chocolate crisp and the filling just right.
FAQs
Can I use natural peanut butter in Butterfinger Balls?
For this recipe, regular creamy peanut butter is best. Natural peanut butter tends to separate and can make the mixture too oily or loose, so stick with the classic creamy kind for the ideal texture.
What’s the best way to crush the Butterfinger bars?
Pop the Butterfinger bars in a zip-top bag and gently crush them with a rolling pin or the back of a spoon. Aim for small shards and bits—some larger chunks make for delightful surprises in every bite.
Can I use white chocolate instead of regular chocolate for dipping?
Absolutely! White chocolate creates a striking contrast with the peanut butter filling and adds a different kind of sweetness. Just melt, dip, and garnish the same way for a gorgeous twist.
Do I have to chill the balls before dipping in chocolate?
Chilling the balls is highly recommended. It firms them up so they’re easier to dip and helps the chocolate set quickly and evenly around each Butterfinger Ball.
Can I make smaller or larger Butterfinger Balls?
Definitely! You can make bite-sized minis or jumbo-style balls—just adjust the portion size when rolling. Keep in mind, smaller balls set faster and are great for parties, while larger ones are especially indulgent.
Final Thoughts
Homemade Butterfinger Balls are one of those magical treats that always hit the sweet spot: easy to make, endlessly customizable, and downright irresistible. If you haven’t tried them yet, now’s the time—gather your ingredients, get a little messy, and treat yourself (and your favorite people) to a batch of these crowd-pleasing delights. Enjoy every delicious bite!
Print
Butterfinger Balls Recipe
- Prep Time: 15 minutes
- Cook Time: 15 minutes
- Total Time: 45 minutes
- Yield: 20 servings 1x
- Category: Dessert
- Method: Mixing, Chilling, Melting
- Cuisine: American
- Diet: Vegetarian
Description
These Butterfinger Balls are a delightful treat that combines the creamy goodness of peanut butter with the crunch of graham crackers and the sweetness of chocolate. Perfect for holiday gatherings or as a special homemade gift!
Ingredients
For the Butterfinger Balls:
- 1 cup creamy peanut butter (not all natural types)
- 4 tablespoons butter, softened (1/2 stick)
- 1 teaspoon vanilla extract
- 1 cup powdered sugar
- ¾ cup graham cracker crumbs
- ½ cup crushed Butterfinger bars
For Coating and Garnish:
- 8 ounces chocolate bark or chocolate chips
- Garnish with additional crushed Butterfingers, holiday sprinkles, or coarse salt
Instructions
- In a medium bowl, combine peanut butter and softened butter, beat with an electric mixer until well mixed. You can also use a stand mixer.
- Add vanilla extract and blend until combined.
- Gradually add powdered sugar in batches, blending on low speed, scraping down the sides.
- Gently stir in graham cracker crumbs and crushed Butterfingers.
- Line a large cookie sheet with parchment paper, scoop out dough into balls, and place on the sheet.
- Chill in the freezer for 30 minutes.
- Melt the chocolate in the microwave at 30-second intervals, stirring between each, until smooth.
- Dip the chilled balls into the melted chocolate.
- Sprinkle with additional crushed Butterfingers, holiday sprinkles, or salt.
- Allow the chocolate to set before serving.
Notes
- You can customize the toppings based on your preferences – get creative with decorations!
- Store the Butterfinger Balls in an airtight container in the refrigerator for up to a week.
Nutrition
- Serving Size: 1 ball
- Calories: 180
- Sugar: 14g
- Sodium: 110mg
- Fat: 11g
- Saturated Fat: 4g
- Unsaturated Fat: 5g
- Trans Fat: 0g
- Carbohydrates: 17g
- Fiber: 1g
- Protein: 4g
- Cholesterol: 5mg
Your email address will not be published. Required fields are marked *