

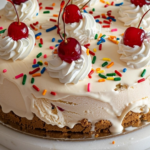
Few desserts summon as much festivity and nostalgia as a Classic Ice Cream Cake. With its dreamy layers of vanilla ice cream, a crisp cookie crust, generous bursts of rainbow sprinkles, ribbons of chocolate shavings, and billowy whipped cream crowned with bright maraschino cherries, this cake is a true centerpiece for everything from birthday parties to summer cookouts. If you love that magical combination of creamy, crunchy, sweet, and cold, this is the cake you’ve been waiting for—easy to assemble, vibrant on the table, and beloved by all ages.

Ingredients You’ll Need
The joy of this Classic Ice Cream Cake is that its handful of staple ingredients work together to create layers of flavor, texture, and eye-catching color. Each ingredient has a part to play, whether it’s adding crunch, sweetness, or that celebratory burst of color on top.
- Crushed chocolate sandwich cookies: These create the rich, chocolatey, crumbled crust that provides a delicious contrast to the creamy layers above.
- Melted unsalted butter: This binds the cookie crumbs into a firm, sliceable base that’s easy to work with and serves as the foundation of your cake.
- Vanilla ice cream, softened: The star of the show—its creamy smoothness forms the beautiful layers that make this dessert so dreamy and satisfying.
- Rainbow sprinkles: A celebration isn’t complete without them; stud your cake with color and fun in every bite.
- Chocolate shavings or mini chocolate chips: These add another layer of texture and a bittersweet flavor that beautifully offsets the sweet creaminess.
- Heavy cream: Whipped to fluffy perfection, this ingredient finishes your cake with elegance and irresistible lightness.
- Powdered sugar: Sweetens the whipped cream and stabilizes it for perfect swirls every time.
- Vanilla extract: For big vanilla flavor in your whipped cream, bringing warmth and aroma to every topping swirl.
- Maraschino cherries: That classic cherry-on-top moment—it’s whimsical, retro, and completes the look of your Classic Ice Cream Cake.
How to Make Classic Ice Cream Cake
Step 1: Prepare Your Pan
Begin by lining a round springform pan with parchment paper. This may seem simple, but it’s an essential step for easy removal and a flawless presentation later. The fitted liner also prevents sticking, so your layers stay crisp and defined.
Step 2: Make the Cookie Crust
Mix your crushed chocolate sandwich cookies with the melted unsalted butter in a bowl, stirring until all the crumbs are evenly coated and glossy. Press this mixture firmly into the base of your lined pan. Take a moment to press the crust really well—it makes for a sturdy, satisfying base. Pop the crust into the freezer for at least 15 minutes while you get your ice cream ready.
Step 3: Layer the Ice Cream
Scoop out half of your softened vanilla ice cream and gently spread it across the chilled cookie crust. Aim for an even, smooth layer—an offset spatula works wonders here, but a regular spoon does the job too. This is the creamy heart of your Classic Ice Cream Cake, so don’t rush this step.
Step 4: Add Sprinkles and Chocolate
Now for the fun part—scatter a generous layer of rainbow sprinkles and chocolate shavings (or mini chocolate chips) over the ice cream. These layers provide bursts of color and little bits of texture throughout, making every slice a surprise.
Step 5: Finish the Layers and Freeze
Scoop the remaining vanilla ice cream over the sprinkled layer, then smooth it out as evenly as possible all the way to the edges. Return the cake to the freezer for at least 4 hours, or until the ice cream is completely firm and set. This waiting time is the hardest part, but it ensures you get those clean, beautiful layers.
Step 6: Make and Pipe the Whipped Cream
Once your cake is fully frozen, whip the heavy cream with powdered sugar and vanilla extract in a chilled bowl until stiff peaks form. Spoon the whipped cream into a piping bag and swirl it decoratively around the edges of your cake. This finishing touch is easier than it looks and transforms your Classic Ice Cream Cake into something worthy of any celebration.
Step 7: Decorate and Serve
Nestle a maraschino cherry atop each whipped cream swirl for a burst of color and nostalgia. Add a sprinkling of extra chocolate shavings or rainbow sprinkles if you like. To get those perfect slices, run a sharp knife under hot water, wipe it dry, and cut the cake while the knife is still warm. Serve your Classic Ice Cream Cake immediately and watch smiles appear!
How to Serve Classic Ice Cream Cake

Garnishes
Garnishes are not just for looks—they add bursts of flavor and happiness with every bite. The maraschino cherries offer a classic, almost retro touch, while extra sprinkles provide pops of color. For the grown-ups, a drizzle of chocolate or caramel sauce brings a new dimension to the presentation and taste.
Side Dishes
Keep sides simple and refreshing; a bowl of fresh berries, a platter of cut fruit, or even a little espresso make lovely accompaniments without overshadowing the star of the show. Because Classic Ice Cream Cake is sweet and rich, something light and tangy, like sliced kiwi or citrus segments, makes the dessert table complete.
Creative Ways to Present
You can truly make this cake your own by playing with shapes and serving styles. Try individual cake rounds for a party, or layer in mason jars for picnic-ready portions. Sprinkle edible glitter for a magical finish, or use themed candles for birthdays. No matter how you serve it, Classic Ice Cream Cake always steals the limelight.
Make Ahead and Storage
Storing Leftovers
Keep any leftover Classic Ice Cream Cake tightly wrapped in plastic wrap or in an airtight container in your freezer. If possible, store slices individually to make impromptu sweet cravings easy and mess-free. The cake will stay fresh and delicious for up to a week, though chances are it will disappear much sooner!
Freezing
Because Classic Ice Cream Cake is meant to be enjoyed frozen, you can easily prepare it several days ahead. After decorating, replenish any whipped cream or cherry garnishes before serving for the freshest look. If you need to do extensive freezing, just ensure your cake is well-protected to prevent freezer burn.
Reheating
There’s no reheating necessary here—just allow your cake to sit at room temperature for about 5-10 minutes before slicing, so it’s easier to cut and scoop. Using a warmed knife ensures smooth slices without melting the ice cream too quickly.
FAQs
Can I use different ice cream flavors in my Classic Ice Cream Cake?
Absolutely! Feel free to get creative with your favorite flavors. Chocolate, strawberry, or even cookies and cream make wonderful alternatives or additions. Just make sure whatever flavors you choose are softened slightly for easy spreading and layering.
How do I keep the cake layers from melting during assembly?
Work quickly and freeze the cake after each major layer to keep everything nice and solid. Have all your ingredients ready before you start, and don’t be afraid to pop the cake back in the freezer if things start to get soft.
Can I make a dairy-free Classic Ice Cream Cake?
Yes, you can easily swap traditional dairy ingredients for dairy-free and vegan options like coconut-based ice cream, non-dairy whipped topping, and plant-based butter. Make sure your cookies and other add-ins are also dairy-free.
How do I get clean slices when serving?
The secret is to use a sharp knife warmed under hot water, then wiped dry before each cut. This creates beautiful, neat slices without squashing the cake or making a melty mess.
Can I add other toppings to my Classic Ice Cream Cake?
Definitely! Feel free to experiment with chopped nuts, caramel sauce, crushed toffee, or even small candies. Personalize your cake for each celebration or based on your favorite flavors.
Final Thoughts
Sharing Classic Ice Cream Cake is like turning any day into a celebration—a delightful blend of old-fashioned fun and irresistible flavor. Give this recipe a try next time you want to delight your family and friends with something special, colorful, and undeniably delicious. Happy scooping!
Print
Classic Ice Cream Cake Recipe
- Prep Time: 20 minutes
- Cook Time: 0 minutes
- Total Time: 4 hours 20 minutes
- Yield: 10 slices 1x
- Category: Desserts
- Method: No-cook
- Cuisine: American
- Diet: Vegetarian
Description
This Classic Ice Cream Cake layers creamy vanilla ice cream with a crunchy chocolate cookie crust, a sprinkle of rainbow confetti, rich chocolate shavings, and fluffy whipped cream swirls topped with bright maraschino cherries. Perfect for birthdays, parties, and summer celebrations, it’s a nostalgic, no-bake frozen dessert that thrills kids and adults alike with every creamy, crunchy bite.
Ingredients
For the Cookie Crust
- 1 1/2 cups crushed chocolate sandwich cookies (such as Oreos)
- 1/4 cup melted unsalted butter
For the Ice Cream Layers
- 1/2 gallon vanilla ice cream, softened
- 1/4 cup rainbow sprinkles
- 1/4 cup chocolate shavings or mini chocolate chips
For the Whipped Cream Topping
- 1 cup heavy cream
- 2 tbsp powdered sugar
- 1/2 tsp vanilla extract
Garnish
- Maraschino cherries, for garnish
Instructions
- Prepare the Pan: Line a round springform pan with parchment paper to ensure the cake releases easily after freezing.
- Form the Crust: In a bowl, combine the crushed chocolate sandwich cookies with melted butter, mixing until all crumbs are evenly coated. Firmly press this mixture into the base of the pan to create an even crust layer. Freeze for 15 minutes to set.
- Layer the First Ice Cream: Spread half of the softened vanilla ice cream over the chilled crust, using a spatula to smooth the surface for an even layer.
- Add Sprinkles and Chocolate: Sprinkle a layer of rainbow sprinkles and chocolate shavings (or mini chocolate chips) over the ice cream, ensuring even coverage for crunch and color.
- Add Remaining Ice Cream: Gently spoon the rest of the softened vanilla ice cream on top. Smooth it out evenly, then freeze the cake for at least 4 hours or until completely firm.
- Whip the Cream: In a chilled mixing bowl, combine heavy cream, powdered sugar, and vanilla extract. Whip until stiff peaks form to make the whipped cream topping.
- Decorate the Cake: Remove the frozen cake from the pan. Using a piping bag or spoon, pipe the whipped cream decoratively around the edges of the cake.
- Garnish and Finish: Top each whipped cream swirl with a maraschino cherry. For extra sparkle, add more chocolate shavings or a handful of sprinkles on top if desired.
- Slice and Serve: For clean slices, use a knife warmed in hot water. Serve immediately and enjoy!
Notes
- Soften the ice cream until it’s spreadable but not melted for easier layering.
- Customize your cake with different ice cream flavors or cookie bases.
- Freeze the cake overnight for the firmest texture.
- Store leftover cake in the freezer, tightly wrapped, for up to one week.
- Add extra sprinkles right before serving for a fresh, colorful touch.
Nutrition
- Serving Size: 1 slice
- Calories: 420
- Sugar: 32g
- Sodium: 180mg
- Fat: 24g
- Saturated Fat: 13g
- Unsaturated Fat: 9g
- Trans Fat: 0g
- Carbohydrates: 48g
- Fiber: 1g
- Protein: 5g
- Cholesterol: 60mg
Your email address will not be published. Required fields are marked *