

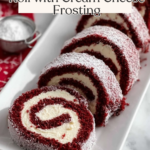
If you’re looking to impress family and friends, look no further than this stunning Red Velvet Cake Roll. With its iconic hue and luscious red velvet flavor, this cake roll wraps up the best of classic red velvet in a showstopper dessert that’s as fun to make as it is to eat. Each slice unveils a beautiful swirl of tender cake wrapped around tangy cream cheese filling, making every bite an irresistible celebration. Whether for a holiday table, birthday bash, or just because, this Red Velvet Cake Roll brings color, sophistication, and pure joy to your dessert spread.

Ingredients You’ll Need
The magic of a Red Velvet Cake Roll comes from a carefully chosen lineup of ingredients working together. Each one adds to the beauty, flavor, and melt-in-your-mouth texture. Gather these kitchen staples and a few pantry surprises and you’re halfway to an unforgettable dessert!
- All-purpose flour: Lends structure and moisture, forming the tender foundation of the cake roll.
- Unsweetened cocoa powder: Creates the subtle chocolate flavor that makes red velvet so alluring—Dutch process or natural works well.
- Baking powder: Ensures the cake bakes up soft and fluffy, perfect for rolling.
- Salt: A pinch brings balance, highlighting the cocoa and tangy notes in both cake and filling.
- Large eggs: Whipped into a light foam, eggs add lift and the signature sponge-like texture, so don’t rush this step.
- Granulated sugar: Sweetens the cake just right and helps stabilize the eggs for a light crumb.
- Oil (canola or vegetable): Adds all-important moisture so your roll stays soft, not dry.
- Buttermilk: For that characteristic velvety crumb and signature tang. In a pinch, milk with vinegar substitutes perfectly.
- White distilled vinegar: Enhances the red color and reacts with cocoa for authentic red velvet flavor.
- Vanilla extract: A splash rounds out the chocolate and cream notes—don’t skip it!
- Red food coloring: The star of the show, delivering that deep signature hue.
- Powdered sugar (optional): For dusting and drama before serving—totally optional but so pretty!
- Cream cheese (cold): The essential tangy base for a classic cream cheese filling.
- Butter (room temperature): Whipped with cream cheese for a rich, silky-smooth frosting.
- Powdered sugar: Sweetens and thickens the filling to the perfect, spreadable consistency.
- Vanilla: Doubles down in the filling for the absolute best flavor.
How to Make Red Velvet Cake Roll
Step 1: Prepare Your Pan and Oven
Start by preheating your oven to 350 degrees Fahrenheit. Line a 15×10-inch jelly roll pan with parchment paper, making sure it covers the bottom and the sides (leave some extra overhanging for easy lifting). If any of the sides of your pan peek out, give them a light grease and flour or use a nonstick spray with flour. Getting your pan ready is key—this helps guarantee the Red Velvet Cake Roll releases flawlessly.
Step 2: Sift and Combine Dry Ingredients
Grab a medium bowl and sift together the flour, cocoa powder, baking powder, and salt. Sifting isn’t just about combining ingredients—it’s what keeps your cake feather-light and free from stubborn cocoa lumps. Set this bowl aside so it’s ready when you are.
Step 3: Whip Eggs for Volume
In a stand mixer fitted with the whisk attachment, whip the eggs on medium speed for a full 5 minutes. Don’t rush—this step is what gives your cake its delicate sponge texture and makes rolling so much easier later. Slowly stream in the granulated sugar and oil while the mixer keeps turning, and watch as it transforms into a pale, frothy base.
Step 4: Mix Wet Ingredients and Combine
Add the buttermilk, vinegar, vanilla, and red food coloring straight into the egg mixture. Mix gently just to combine—the red will practically glow! Now add your flour mixture, mixing until just incorporated. Pour the batter into the prepared pan, using an offset spatula to spread it evenly to every edge.
Step 5: Bake to Perfection
Bake your cake at 350˚F for 13-15 minutes. You’re looking for a cake that springs back in the center when lightly pressed or passes the toothpick test (clean or with a few moist crumbs). Don’t overbake—this is how you ensure the cake rolls without cracking.
Step 6: Roll While Warm
Once the cake is done, use those parchment overhangs to lift it onto a wire rack. Wait 3 minutes—the steam helps make the cake pliable—then fold the parchment over one short edge and roll the cake, parchment and all, into a log while it’s still warm. Let it cool completely on the wire rack; this is where the Red Velvet Cake Roll really takes shape.
Step 7: Make Cream Cheese Filling
While the cake cools, combine cold cream cheese and room temperature butter in a bowl, beating until creamy and smooth. Add powdered sugar and vanilla, mixing just until incorporated. Pop the frosting in the fridge while you wait—chilling makes it easier to spread later.
Step 8: Unroll and Fill
Once the cake is cool, carefully unroll it. If it feels a bit damp or sticky, let it air out for a few minutes. Then, dollop the cream cheese frosting over the top, spreading it evenly but leaving half an inch bare on the far edge. Keep your spatula in the frosting as you spread to prevent crumbs from mixing in for a flawless swirl.
Step 9: Roll Again and Chill
Reroll the cake tightly (without the parchment), tucking in the filling as you go. For the most beautiful slices, wrap your Red Velvet Cake Roll in plastic wrap and chill it in the fridge or freezer for 1–2 hours (or even overnight) to help it set perfectly.
Step 10: Slice and Serve
Unwrap your masterpiece and, if you’d like, dust with a little powdered sugar for sparkle. Use a serrated knife to slice into 12 even pieces, rinsing the blade between cuts for neat layers that wow. Now, take a moment to admire that beautiful spiral!
How to Serve Red Velvet Cake Roll
Garnishes
For a festive touch, sprinkle the Red Velvet Cake Roll with a flurry of powdered sugar, a few chocolate curls, or even a scattering of fresh raspberries. A small mint leaf adds a pop of color, and a drizzle of melted white chocolate can turn each slice into a bakery-worthy treat.
Side Dishes
Pair each slice with a scoop of creamy vanilla ice cream or a dollop of freshly whipped cream for a dreamy contrast. Coffee or espresso brings out the subtle cocoa flavor, or try a glass of cold milk for old-fashioned comfort. Fresh berries are a delightful and colorful companion, especially during spring and summer gatherings.
Creative Ways to Present
For extra drama, serve your Red Velvet Cake Roll on a cake stand and slice at the table so everyone can admire the perfect spiral. Layer slices in individual dessert glasses with extra cream cheese frosting for a luxe parfait, or cut into petite rounds for elegant mini desserts at parties. There’s truly no wrong way to show off this stunner!
Make Ahead and Storage
Storing Leftovers
Store any leftover Red Velvet Cake Roll tightly wrapped in plastic wrap or an airtight container in the refrigerator. It stays fresh and incredibly moist for up to 4 days, making it a great make-ahead dessert for busy weeks or entertaining.
Freezing
Yes, you can freeze the Red Velvet Cake Roll! Wrap the whole roll or individual slices in plastic wrap, then a layer of foil. Freeze for up to 2 months. Just thaw overnight in the fridge before serving for the same rich flavor and smooth swirl.
Reheating
This cake roll is best enjoyed chilled or at room temperature to preserve the cream cheese filling. If you like it just slightly warmer, allow a cold slice to sit out for 15–20 minutes—no microwave needed. Warming any more can affect the frosting’s texture.
FAQs
Can I make Red Velvet Cake Roll without a jelly roll pan?
A jelly roll pan is ideal for even baking and easy rolling, but if you have a rimmed baking sheet close to 15×10 inches, you can use it. Just keep an eye on the bake time and ensure even spreading.
My cake cracked during rolling—how do I prevent that?
Cracking often happens if the cake is overbaked or rolled when cool. Roll it up while still warm and moist, and don’t skip letting steam escape for those crucial few minutes. If cracks happen, powdered sugar or extra frosting can cleverly disguise them!
Is the red food coloring necessary?
For classic red velvet color, yes—but for a natural take, beet powder or gel coloring can be used, though the hue will be softer. The flavor remains just as delicious, so use what feels right for you.
Can I use low-fat cream cheese for the filling?
You can, but full-fat cream cheese creates the richest, silkiest filling. Low-fat versions can be softer and slightly less stable for spreading, so chill the filling well before using.
Could I turn this into cupcakes or a layered cake instead?
While this batter is designed for rolling, it can be adapted as cupcakes or a classic layer cake! The texture will be lighter and more sponge-like than traditional red velvet, but the signature flavor will shine.
Final Thoughts
If you’ve never tried your hand at a Red Velvet Cake Roll, this is your invitation to jump in. Every step delivers a rewarding mix of beauty and flavor—plus, just imagine the smiles when you serve that first spiral slice! Treat yourself (and your loved ones) to a dessert that’s as fun to make as it is to eat.

Red Velvet Cake Roll Recipe
- Prep Time: 30 minutes
- Cook Time: 15 minutes
- Total Time: 2 hours 45 minutes
- Yield: 12 servings 1x
- Category: Dessert
- Method: Baking
- Cuisine: American
- Diet: Vegetarian
Description
This Red Velvet Cake Roll recipe is a delicious twist on the classic cake, with a moist and tender red velvet sponge rolled around a creamy, tangy cream cheese filling. Perfect for special occasions or a sweet treat any time!
Ingredients
Cake:
- ¾ cup all-purpose flour ((stir, spoon & level))
- ¼ cup unsweetened cocoa powder
- 1 tsp baking powder
- ½ tsp salt
- 4 large eggs
- ¾ cup granulated sugar
- 1 Tbsp oil ((canola/vegetable))
- 2 Tbsp buttermilk ((or 2 Tbsp milk plus 1/2 tsp vinegar; let sit 5 minutes before using))
- 1 tsp white distilled vinegar
- 1 tsp vanilla extract
- 2 Tbsp red food coloring ((one 1 oz bottle))
Filling:
- powdered sugar (optional)
- 8 oz brick cream cheese (cold)
- ½ cup butter ((1 stick) room temperature)
- 1 cup powdered sugar
- 1 tsp vanilla
Instructions
- Preheat oven: Preheat oven to 350°F. Line a 15×10-inch jelly roll pan with parchment paper.
- Sift dry ingredients: In a bowl, sift together flour, cocoa, baking powder, and salt. Set aside.
- Whip eggs: In a stand mixer, whip eggs until light and frothy. Slowly add sugar and oil.
- Combine wet ingredients: Add buttermilk, vinegar, vanilla, and red food coloring. Mix in flour mixture.
- Bake: Pour batter into pan, spread evenly, and bake for 13-15 minutes.
- Roll the cake: Roll the warm cake into a log, then cool on a wire rack.
- Make filling: Beat cream cheese and butter, add powdered sugar and vanilla. Chill.
- Fill and roll: Unroll cake, spread filling, re-roll tightly. Chill for 1-2 hours.
- Serve: Dust with powdered sugar, slice, and enjoy!
Notes
- For best results, refrigerate or freeze the cake roll before slicing.
- Ensure cake is completely cooled before adding the filling.
- Use a gentle touch when rolling the cake to prevent cracking.
Nutrition
- Serving Size: 1 slice
- Calories: 280
- Sugar: 20g
- Sodium: 240mg
- Fat: 18g
- Saturated Fat: 10g
- Unsaturated Fat: 6g
- Trans Fat: 0g
- Carbohydrates: 26g
- Fiber: 1g
- Protein: 4g
- Cholesterol: 110mg
Your email address will not be published. Required fields are marked *